EXPERIMENTS:
STEP 1: Create guideRNA Plasmid

Why
We first produced our gRNA plasmids in order to stop expression of targeted fluorescent proteins on our reporter plasmid.
How
Results
STEP 2: Create Reporter Plasmid

Why
To create a stepwise and logical order of production, a reporter plasmid was constructed firstly, out of only various promoter types, mRFP and terminators, to allow for testing. This was then escalated to include dCas9 for the final experiment.
How

Each individual Promoter-Reporter-Terminator brick contains interchangeable parts. The three parts are linked together with Bsa1 sites so that there is no preference for any part when ligating together. This allows randomness to be added later. This method is used also for the construction of Promoter-gRNA-Terminator bricks so that this could be randomised in the future. The bricks are then flanked by a prefix and suffix, and these are flanked by restriction sites ABCD on either end. Digestion of bricks with A+B, B+C, and C+D allows any brick to be placed in any position within the plasmid but it would be pre-determined. This means that the no one promoter-reporter-terminator brick would be limited to one specific place in the plasmid, which allows another level of randomness in assembly as we would not know which reporter was being placed where, which could also affect expression levels.
The arrangement of the DCBA restriction system means that any brick can be placed in any position in the plasmid which allows expansion of possibilities whilst maintaining randomness of insertion later. Bricks can be joined together via amplifying each randomly assembled brick through common amplification sites and then cutting them using a set of restriction enzymes which give each plasmid a specific order of bricks, depending on which are cut and then ligated together.

This was then used for the promoter library.
After this, the same method as above was used for the final dCas9 including vector. However with an addition of dCas9 in the final ligation phase. In this way two promoter libraries were produced.
Results
Found in promoter library section.
STEP 3: Promoter Library

Why
A library of promoters with variant expression capacity was constructed for use with reporter proteins. RFP was used as the reporter for ease of screening.How
Results


STEP 4: Random Ligations

Why
The random ligation of different promoter-protein bricks is an experiment to test the viability of a brownian motion driven random ligation process. This random ligation is the basis for the unpredictability of a large scale key design process. The experiment hoped to produce a random mixture of fluorescent protein expression levels. This random mixture of multiple proteins in a single vector would then show the viability of the Key.coli restriction enzyme-ligation process for achieving unpredictability for keys.
How
The highest and lowest performing promoters were chosen to give the most easily visible result. Promoter E and Promoter 4. Promoter 4 gives a high expression of fluorescent proteins, as shown by our promoter library findings. The promoters were then attached to each reporter protein CFP, RFP and GFP via BSAI digestion and ligation (creating no scar sites) along with a terminator to form six "brick" variants. After amplification of the bricks produced via PCR, seven products combinations were ligated to a low copy backbone in the pattern of red, green and then blue (fluorescent protein) consistently through controlled use of the DCBA digestion site. In addition to a set of "random ligations". Each ligation has only one ligation slot (due to availability of restriction cut sites) per reporter type/colour, leaving random chance to produce a combination of all the possible variants in the random ligations where multiple promoters are available.
e= empty promoter, h= high expression promoter

These bricks were ligated with the backbone as follows:
This produced a control for each reporter fluorescent protein in isolation. It also produced a control for all reporters on either highest expression or lowest expression. This finally also produced a random set of colonies for isolation (after transformation) for comparison and test for true randomness.
Results
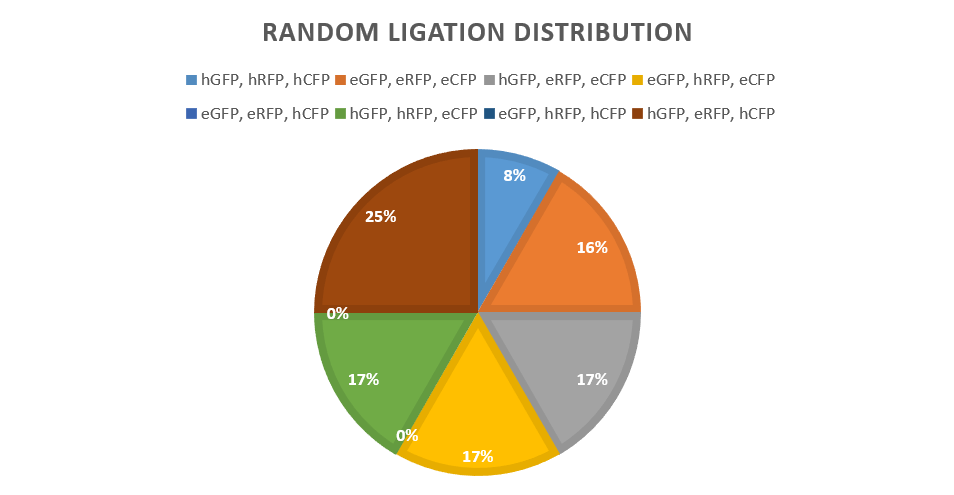
Twelve colonies were picked from the pilot study of random ligation, which gave the following distribution:
STEP 5: Freeze Drying & Revival

Why
For Key. coli to work as intended and not deteriorate we need need to things to occur:
- The E. coli cells must be kept inactive so that nutrients is not depleted causing the transformed cells to die
- The E. coli cells must be able to be activated after inactivation to allow the fluorescent genes to be expressed to give the key its unique fluorescent code which will allow access to the appliance.
How
To accomplish this, we chose to freeze dry the cells within the key. Click here for out protocol for freeze-drying cells.
Results

Figure 1: Graph of strong promoter 4 and weak promoter 1 transformed cells RFP fluorescence assay after freeze-drying revival two weeks and three weeks after samples were freeze dried.
In our results for freeze-dried cell revival, seen in Figure 1, we can show that storage temperatures do not have an effect on the revival of cells. For strong promoter 4 (SP4), at timepoint of 4 hours and 6 hours the storage temperature does seem to have a negative affect on the relative RFP fluorescence. However our sample size is very small meaning further assays would be needed to confirm this.
STEP 6: CRISPRi & gRNA Efficiency

Why
How
Results


