Team:Sydney Australia/Protocols

-
Figure out the total number of plates you will need, then multiply x 25 to get the approx. amount of agar you will need (in ml). Its better to make more than you think you need ! Alternatively, just make up the agar in multiples of 400 ml, this a standard amount that will make ~16 plates (this is about right for one ‘sleeve’ of sterile petri dishes, which have 20 dishes in them).
-
Add all the required media ingredients (eg. for LB agar, this is 10 g tryptone, 5 g yeast extract and 5 g of NaCl per litre) – make sure you correct these ingredient weights for the amount of agar you are making (e.g. multiply by 0.4 if you are only making 400 ml).
-
DON’T ADD THE AGAR YET ! (this doesn’t dissolve, it settles out)
-
DON’T ADD ANTIBIOTICS, TRACE METALS, or TWEEN yet, if these ingredients are needed.
-
Dispense the media into multiple lots of 400 ml in 500 ml media bottles. Make sure that the media bottles have a plastic pouring ‘lip’ on them, not just a naked glass top; the lip is important to be able to pour the agar neatly. You could also make multiples of 200 ml in 250 ml bottles, but don’t make >400 ml in a 1 L bottle – this is too heavy to easily pour plates with.
-
Once you have dispensed the media into the bottles, now you can add the appropriate amount of agar to each bottle. This is 17 grams per litre (=6.8 grams per 400 ml). DON’T USE AGAROSE!
-
Add bottle caps. Don’t screw these on all the way, leave them a bit loose. Hold the caps in place with a small piece of autoclave tape.
-
Arrange bottles of agar in a wire rack, add a piece of masking tape on one corner with your name and the lab number (566), then take to the autoclave. If the agar media will not be autoclaved on the same day, keep it in the cold room until the next day (microbes will start to grow within a few hours, especially in rich media like LB)
-
When the agar comes out of the autoclave, if its still molten and very hot, put it in the hot water bath (~60°C) until it cools down to pouring temperature (~15 min). If you don’t want to use it immediately, leave on the bench until it solidifies (if it hasn’t already), then tighten the cap and it can be stored indefinitely at room temp. If agar has solidified and you want to use it straight away, microwave it (lid loose!) for approx 10 min on 50% power (these settings are for 400 ml of agar at room temp, adjust accordingly!), then put in hot water bath for ~15 min.
-
Prepare laminar flow hood for plate pouring as follows: give it a blast of UV for ~15 min (switch in upper position, with the doors closed!), then turn off UV light (switch in middle position), take out the doors, then turn on the light and fan (switch in bottom position). Swab down with 80% ethanol.
-
(optional). If you are working with very slow-growing microbes and/or you are making rich medium non-selective plates, you can add an extra layer of sterility to the proceedings by wearing gloves, and rinsing the gloves thoroughly in 80% ethanol before you start pouring the plates.
-
(optional). If you don’t have access to the laminar flow hood, you can make plates on your regular lab bench. This is usually fine, but swab down the bench with ethanol first, and work close to the Bunsen flame. (if you swab your gloves with ethanol, be careful to let this evaporate before turning on the Bunsen burner!)
-
Collect one bottle of molten agar from the waterbath, wipe down the outside with paper towel, and take to your bench. Add any “after-autoclaving” additions at this stage, from filter-sterilised stock solutions (this may be antibiotics, or trace metals solution, or Tween etc). Mix by swirling for 10-20 seconds, don’t shake the bottle as this will cause persistent bubbles. Its good practice to write all the additions on the bottle, then tick them off after each addition. Forgetting these is bad!
-
Take the final agar to the laminar flow hood. Open up one sleeve of plates (at the ‘base’ end), and slide them out. Keep the sleeve! Label all the plates with the type of medium (e.g LB-Cm25). Pour the agar into the first plate; use a single smooth pouring motion. Stop when it reaches all the edges. Put the lid on. Do the next plate. Repeat. Don’t stack up the plates in big towers, they will take longer to cool.
-
Leave the plates for about 10 min to alow the agar to solidify. Then invert the plates with the lids off to allow them to dry for 20-30 min. The setup should look like this:

-
If you don’t dry the plates, you won’t get nice spread-plates, and the risk of contamination is greater from other microbes ‘climbing’ into the plate over the edge.
-
Pack the plates back into the sleeve, then label the sleeve with the type of agar and the date of manufacture and your name. (don’t label the individual plates with the date, this is confusing, since the date written on an agar plate is usually the date it was inoculated).
-
Store plates in the cold room. They should stay good for >6 months if you have been careful!
NOTES: First quantify the plasmid (by gel comparison, not nanodrop!), and quantify the insert DNA (usually a column-purified PCR product; you can use nanodrop for this) then set up digests, as below. A typical setup would be 250 ng plasmid and 250 ng insert in digest volume of 100 ul (these numbers used below), but range may be 100-1000 ng of each DNA, in a volume of 30 – 200 ul.
Check which restriction buffer is appropriate. For double digests, it’s OK to use a buffer which gives 100% activity for one enzyme, and 75% activity of the other, but lower than this is not good. Also check the appropriate digest temperature, its usually 37°C, but not always.
DIGEST OF PLASMID
-
Calculate how much volume of plasmid you need to use to get 250 ng – call this ‘X’.
-
Calculate how much water to add to the digest; this is (100 – 10 – 2 – X) – call this ‘Y’.
-
Retrieve 10 x restriction buffer from freezer, thaw completely, and vortex to mix. Ensure the buffer is fully thawed. The same tube of buffer can be used many times, if you are careful with your aseptic technique. The buffer doesn’t have to be kept cold.
-
Retrieve the plasmid from the freezer, allow to thaw, (e.g. in 37°C waterbath, or rub in your hands, or on bench etc), then put it on ice when it is thawed. Its not good to leave the plasmid stock at room temp or above for prolonged periods or it may degrade due to traces of nucleases.
-
Retrieve the restriction enzyme(s) from the freezer, put IMMEDIATELY on ice. These are heat-sensitive and you need to look after them. Do not leave them at room temp. Keep on ice while setting up the reaction, then immediately put back in freezer. These don’t need to be thawed, they are in a glycerol solution which doesn’t freeze at -20°C.
-
Label your tube(s), then set up the digest(s) by adding the ingredients in the following order. Make sure you use excellent aseptic technique, and change tips every time. It's OK to set this up at room temp, the reaction tube doesn’t have to be on ice.
-
10 ul of 10x restriction buffer
-
‘Y’ ul of sterile MQ water
-
‘X’ ul of plasmid DNA
-
2 ul of (each) restriction enzyme
------------------------------------------------
Total 100 ul
-
-
Mix by flicking, then tap on bench to get liquid to bottom of tube. Incubate at correct temperature for approx. 2 hours. (1 - 4 hr is OK, but overnight digest is too long; this can lead to ‘raggedy ends’ of the plasmid even if it looks OK on a gel; this is due to non-specific nuclease activity)
NOTE: 100 ul seems like a large volume to use, but this helps dilute any impurities in the plasmid prep. Increasing the total volume of the digest and/or reducing the volume of plasmid added often help to improve the quality of a poor digest. If the digested plasmid is for the purpose of ligation, we can use a large volume, since it will be column-purified & concentrated anyway.
DIGEST OF INSERT DNA
-
Calculate how much volume of insert DNA you need to use to get 250 ng – call this A.
-
Calculate how much water to add to the digest; this is (100-10-2-A) – call this B.
-
Label your tube(s). Set up digest by adding ingredients in the following order. Make sure you use excellent aseptic technique, and change tips every time. Its OK to set this up at room temp.
-
10 ul of 10x restriction buffer
-
‘A’ ul of sterile MQ water
-
‘B’ ul of insert DNA
-
2 ul of (each) restriction enzyme
------------------------------------------------
Total 100 ul
-
Mix by flicking, then tap on bench to get liquid to bottom of tube. Incubate at correct temperature for approx. 2 hours. (1 - 4 hr is OK, but overnight digest is too long)
-
Dephosphorylate the vector by adding 11 ul of 10x phosphatase buffer and 2 ul of antarctic phosphatase enzyme, incubate 30 min at 37°C. Note that you don’t need to purify the DNA between digestion and dephosphorylation, but you need to top up the buffer with the specific phosphatase buffer, which adds Zinc. This step prevents the vector religating to itself, and is essential for cloning when a single restriction enzyme is used to cut on both sides; it is not required (in theory!) when you are cloning with two different restriction enzymes.
-
6. Purify both vector and insert DNA using Qiaquick columns (or similar), elute in 15 ul EB.
-
Mix your DNA sample with the appropriate buffer, in the appropriate ratio:
-
DNA < 4 kb: Mix 1 vol sample with 3 vol of QG buffer
-
DNA > 4 kb: Mix 1 vol sample with 3 vol of QG buffer + 1 vol isopropanol***
-
PCR products: Mix 1 vol sample with 5 vol PB buffer.
*** For large DNA fragments in TAE-agarose, DON’T add the isopropanol immediately here. First melt the agarose in the QG with heating (60 C for 5 min is usually. enough, mix occasionally), then when it’s all dissolved, allow to cool to room temp, then add the isopropanol.
-
Load the mixture onto a Qiaquick spin column (purple) and spin 30 sec 10,000g.
-
Discard the flow-through, and replace spin column in the catch tube.
-
The spin column will hold a max. of 800μl sample and has a max. Binding capacity of approx 10 μg DNA. You can wash through multiple 800 μl aliquots of DNA+QG if you have a lot of sample, so long as the total amount of DNA added doesn’t exceed approx 10 μg per column. (if it does, this is not a tragedy, it just means you will lose some of your DNA)
Add 750 μl of buffer PE to the column, allow to sit for ~2 min, then spin 30 sec, discard flow-through, replace spin column in catch tube.
Spin again for 30 sec to remove all traces of PE from the column. Discard both the flow-through and catch tube, and transfer the spin column onto a clean Kimwipe. Leave the column lid open. Transfer Kimwipe to 50°C incubator box, and allow to dry for 10 min.
Transfer spin column to a sterile 1.5 ml Eppi tube, and add 50 μl* of EB buffer (5 mM Tris, pH 8) to the centre of the spin column – ie on the membrane, not the walls of tube. Allow to sit for 5 min. Spin 30 sec, retain Eppi tube with DNA solution in EB, discard spin column.
* Can reduce this to as little as 15 μl EB to give a more concentrated DNA solution (you will lose approx 3-5 μl EB during the procedure). Using larger volumes of EB will increase the overall yield of DNA, while using smaller volumes will increase the concentration of DNA. Which one is better depends on what you are using the DNA for…usually for ligations, concentration is more important than yield, so go with the 15 µl amount.
-
Retrieve one 10x ligase buffer aliquot from the -20°C freezer. This should be a small amount of buffer (e.g. 10 µl) in a small generic tube, not the large tube from the manufacturer with ~1 ml of buffer. If there are no ligase buffer aliquots prepared, make these by aliquoting multiple 10 µl lots into small Eppi tubes, and freeze at -20°C. The ligase buffer (unlike restriction buffer) cannot be repeatedly frozen and thawed, it starts to ‘die’ after even one freeze/thaw cycle.
-
Retrieve the T4 ligase enzyme from the -20°C freezer and put IMMEDIATELY on ice. This reagent is VERY heat sensitive, and must be handled with care.
-
Put your labelled tube(s) on ice, then set up the ligase reaction in this tube on ice. Be careful not to get ice or melted ice in the tube - this is not sterile! Add reagents in this order (aseptic; change tips each time) :
-
2 µl of 10 x ligase buffer
-
8 µl purified insert DNA
-
8 µl purified plasmid DNA
-
2 µl of T4 DNA ligase enzyme
------------------------------------------------
Total 20 µl
-
Mix by flicking (brief! 5 sec), then tap on bench to get liquid to bottom of tube (brief! 5 sec). Incubate at 4°C overnight. You can do this instead at room temp for 1 hour, but it doesn’t work quite as well. Supposedly 16°C overnight is ideal, but this a tricky temperature to achieve in practice.
-
-
Return ligase immediately to -20°C freezer. Throw out any unused thawed ligase buffer.
Use excellent aseptic technique at all times. All materials must be sterile.
Protocol can be scaled up or down as required. 100mL of E. coli culture produces about 50 x 220 µL aliquots of competent cells. Each individual aliquot of cells is sufficient for 4 transformations (4 x 50µl, with a bit left over as a safety margin).
The competent cells can also be used fresh, without making frozen aliquots, this actually works even better, but it is tedious to do over and over, thus we typically make frozen stocks. These freezer stocks don’t survive multiple freeze/thaw cycles well, so throw out unused cells if there are leftovers after your transformation experiment.
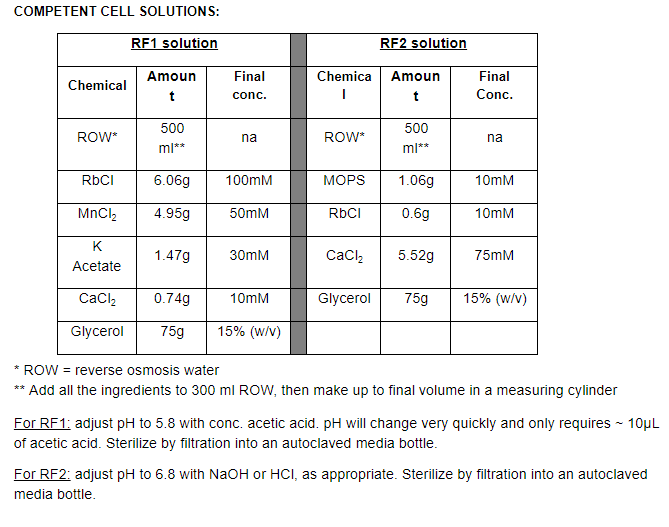
After step 6, work on ice and in the cold room to increase the quality of the final cell prep. Keep RF1 and RF2 solutions in cold room/fridge, so they are always ready to use. At the beginning of the day, place centrifuge bottles in cold room or in the -20°C freezer, ready to use.
PROTOCOL:
-
Streak E. coli strain (e.g. JM109, TOP10, DH5α) from glycerol stock or other source onto plain LB agar (no antibiotics). Incubate overnight at 37°C.
-
Check that culture looks pure. Inoculate a 5mL plain LB broth with growth (several colonies) from the LB plate. Incubate overnight (16-24 h) at 37°C, with shaking
-
Aseptically inoculate 100mL plain LB broth (in a 500mL Schott bottle or Erlenmeyer flask) with 3 ml of overnight culture; this should give an initial OD600 of ~0.05. (check this to be sure)
-
Grow cells at 37°C with shaking, until the culture reaches OD600 of ~0.5 (anywhere from 0.3-0.7 is OK, but try to get close to 0.5). This should take 2-3 hours, so check the OD600 every 15 minutes or so after the first hour of incubation.
-
Aseptically transfer (pour) the cells into sterile centrifuge tubes or bottles (one 250 ml Sorvall bottle or 2 x 50 ml Falcon tubes) and balance these, either by transferring culture aseptically between the tubes/bottles or by adding sterile water or LB to the lighter tube/bottle.
-
Centrifuge at 4000 rpm (~3000 g in Centaur/Centurion machine) at 4°C for 10 minutes. Note: centrifuge needs to be cold. Turn on and set temperature beforehand. You can spin faster, up to say 7000 g, but above this point, faster is not better, and cell pellets will be hard to resuspend.
-
Working in the cold room with the cells on ice, pour off the supernatant into culture waste (don’t let the centrifuge tube/bottle actually touch the edge of the culture waste bottle). Try to remove as much of the liquid as possible – give it a shake / tap to assist this.
-
Resuspend the pellet gently in 33mL RF1 solution by vortexing and/or shaking the tube/bottle. It's OK to be rough with the cells at this stage in the process, but you shouldn’t need to shake or vortex for more than 10 sec or so.
-
Incubate on ice for 1 hour, then pellet the bacteria again at 4000rpm, 4°C for 10 minutes.
-
Working in the cold room, pour off the supernatant into culture waste. As before, try to remove as much of the residual liquid as possible.
-
Resuspend the pellet in 8mL RF2 solution by vortexing or shaking. At this stage, the cells have become more fragile due to the RF1 treatment, so its important not to shake/vortex any longer than ~10 sec (this shouldn’t be necessary).
-
Incubate on ice for 15 minutes. While the cells are incubating, set up all your Eppi tubes (~50) on ice with the lids open, so they are pre-chilled, and ready to receive cells. Label these tubes on top with the strain name before putting them on ice (labelling becomes difficult with cold and wet tubes!). Be careful to only push the tubes only about 2/3 of the way into the ice. If they are pushed in too far (right up to the lip of the tube), you risk getting ice or melted ice (not sterile!) into your cell aliquots
-
Working quickly (but still carefully!), aliquot 220 µL of cell suspension into the pre-chilled Eppi tubes. Once dispensed, close tube lids tightly, and collect all tubes into a bag/box with a clear and prominent label and store it immediately in the -80°C freezer. It’s a good idea to label both the outside of the bag/box AND place a label written on paper inside.
-
Test the transformation efficiency of the freshly-prepared competent cells using a known amount of a plasmid standard (see protocol for heat shock transformation).
-
Streak out a loopful of the cells onto plain LB medium (using either a sample of a frozen aliquot or some residual cells remaining in the large centrifuge tube/bottle), and incubate at 30°C for three days to allow any of the common types of contaminants (e.g. Staphylococcus) to grow. This is to check the purity of the cell stock. The streak-plate should look completely uniform, with colonies of only one type (E.coli), and no heterogeneity in the initial patch or the streaklines which would indicate a mixture of bacteria is present.
-
Remove one or more aliquots (as required) of chemically competent cells of your E.coli strain from the -80°C freezer. Thaw the cells e.g. by rubbing them in your hands or put them briefly in a 37°C waterbath, but don’t let them stay warm! As soon as they are thawed, put them onto ice.
-
Divide the cells into the appropriate number of 50 µl aliquots in separate Eppi tubes on ice. Add your DNA samples to each tube; you can use up to ~10 ul of ligation mixture or plasmid here, but note that typically 3 µl of ligation mix or 1 µl of plasmid would be standard.
-
Make sure you include both a positive control and a negative control in the transformation experiment. The positive control should be 1 µl of a plasmid with the correct antibiotic resistance (same resistance as the plasmid used for the ligation), and should also be a plasmid stock that you know is in good condition (based on agarose gel).The negative control is simply no DNA added.
-
Put the cells into a foam ‘floatie’ and put on ice. Ensure at least the bottom half of the tube (approx 2 cm) is embedded in the ice, don’t just rest them on top of the ice. Allow the cell/DNA mixtures to incubate on ice for 15-30 min.
-
Take your esky of ice over to the 42°C waterbath or 42°C heat block. Put the floatie into the waterbath. Allow 45 seconds for heat shock. (Plus or minus 10 seconds, this needs to be exact!). Then transfer the floatie straight back onto ice (embed into ice, as above, don’t just rest on top).
-
Allow transformation mixtures to sit for 2 min on ice, then add 1 ml sterile LB broth to each tube. You can also use more fancy media (e.g. SOC or SOB), but there is not that much difference.
-
Incubate on 37°C shaker for 1 hour. Put the tubes horizontal so they get good shaking action. eg. put the tubes laying flat on the shaker platform and masking-tape into place. Make sure the lids are tight! You can incubate without shaking, and you can incubate for less time (30 min), but it won’t work as well in these cases.
-
Label the LB-antibiotic plates before starting the next bit; you need two plates for each ligation condition or plasmid type, since we will plate out two different cell concentrations of each to ensure we get countable/pickable numbers of colonies. Double check the plates to ensure you are using the correct type of antibiotic(s) for the type of plasmid(s) you are using.
-
Pipette 100 µl of the first cell suspension onto one LB-antibiotic plate (label ‘100 µl’ in addition to other info). Sterilise the glass spreader with ethanol and flame (CAUTION! READ THE SOP FIRST!), and spread the cells around the plate with the spreader. Do this by pushing the spreader with a back-and-forth motion, while turning the plate around in a circular motion. Be careful not to touch the spreader on your fingers! Keep spreading for approx 10 seconds.
-
If the plates are properly dried, you should feel the spreader start to ‘stick’ to the agar, this means the liquid has been drawn into the agar. If this doesn’t happen after ~20 seconds, stop spreading, but next time, dry plates for longer! If the plates are incubated with a lot of liquid still on them, you may not get nice discrete colonies (the cells will swim around in the liquid, making a mess).
-
Spread 100 µl of the remaining samples, each onto a separate, appropriately-labelled plate.
-
Centrifuge all the tubes at ~15,000 rpm for 1 minute in a micro-centrifuge. Pour off most of the supernatant into culture waste (being careful not to touch the tubes on the edge of the culture waste bottle). Leave a little bit of liquid behind (about one or two drops).
-
Vortex the cells in the remaining liquid for about 10 seconds, until they are not sticking to tube anymore, and you have a nice smooth, even, cell suspension.
-
Pipette the cells from the first cell suspension onto the appropriate pre-labelled LB-antibiotic plate (label with ‘pellet’ in addition to other info), and spread plate as described above, using the glass spreader. Repeat for the remaining samples
-
Incubate all plates at 37°C overnight. Note that for some plasmids and ligations, it may be beneficial to instead try room temp for 2-3 days – this lowers the copy number of pUC type plasmids, and is useful to allow retrieval of clones that might be toxic to the host.
-
When examining your plates, first check your controls. The positive control should have thousands of colonies, perhaps even a confluent lawn of growth, especially on the ‘pellet’ plate. the negative control should have no colonies at all. If you don’t see these results with the controls, anything you see on your experimental plates is questionable. Common problems and their interpretation are summarised in the Table below. Detailed troubleshooting of the different ligation controls and their results is described in a different protocol.


-
The diagram shows some PCRs that can be used to determine if a plasmid clone is:
A. The desired recombinant
B. Some other kind of recombinant
C. The vector only -
The PCR using primers F1-R1 is the best starting point for screening– this is the ‘left junction’ PCR. If you get a product of the expected size in this PCR, this is a good indication that you have the desired recombinants. The PCR using primers F2-R2 (right junction PCR) can then be done on clones that are positive in the F1-R1 PCR. If the clones are also positive in this PCR, this is further evidence that they are the right thing.
-
The PCR using primers F1-R2 is known as a ‘spanning’ PCR or ‘insert spanning’ PCR – this will amplify the whole insert region. This PCR can be used to determine if the clones have an insert of the expected size, but note that this is not an all or nothing PCR, unlike the junction PCRs. In the spanning PCR, the clones will give a small product if they have no insert, and a large product if they have an insert. This PCR is a bit ambiguous though, since if you have a mixed population of cells in your template DNA, you may see only the small product (this is amplified preferentially), even if you do have some positive clones in there too. The spanning PCR is most useful in preparation for sequencing the insert DNA region, rather than for initial clone screening.
-
The primers used for amplification of the original DNA insert (not shown in diagram) can also be used for screening PCRs. e.g. these primers used on their own can tell you if the insert DNA is present. (but they wont tell you which way around it has been cloned, unlike the junction PCRs). You can also do a junction PCR using one of the original primers, and a primer in the vector on the other side of the insert DNA, although this may give large products, and a less reliable PCR compared to using dedicated junction screening primers.
-
The positioning of the screening primers is important for later steps (sequencing). Make sure that the primers F1, R1, F2, R2 are at least 50 bp away from the ligation join – this is because the first 20-30 bp of sequence read are usually ‘junk’. Also ensure that these primers are not *too* far from the ligation join, otherwise you are amplifying (and later sequencing) stuff that you don’t need to, and it makes the PCR take longer to thermocycle. Placing the primers about 100 – 150 bp from the ligation join is good, which gives an overall PCR product size of 200-300 bp.

-
Choose 20 well-isolated colonies from your transformation plates. Circle these and number them on the base of the plate.
-
Label three PCR strip tubes with numbers 1- 20, leaving three blanks (one in each strip) as negative controls. (so your first strip should be clones 1-7, the next one should be clones 8-14, and the last one should be clones 15-20)
-
Using an agar plate containing the appropriate antibiotic, divide the plate into patches, using a square grid (5 x 5). Label twenty of the squares with numbers 1 to 20. (see diagram)
-
Prepare a PCR master mix with the appropriate left junction PCR primers, enough for ~30 PCRs, aliquot this into 3 x 8 lots of 25 µl in the labelled PCR strip tubes. Taq polymerase is good for this job (it is very robust to ‘mess’ in the PCR) but other polymerases can also be used.
-
Using a white pipette tip, pick up some growth from the colony of your first clone of interest. Make sure you can see some cells on the tip, but you don’t need a lot (approx 1 mm3 = 1 µl). Dip the tip in and out of the mix in the first PCR tube five times. You don’t need to dislodge the whole chunk of growth, enough cells will fall into the mix to give you a product, if the gene of interest is there. (this is called a ‘colony PCR’)
-
With the same tip, transfer the remaining growth onto the first patch on your agar plate, by scratching the tip across the surface of the agar a few times (e.g. make a set of three closely-spaced parallel lines – see diagram). Stay well clear of the borders of each square, we don’t want the clones to touch each other when they grow up. Then discard the tip.
-
Repeat steps 3 and 4 with the remaining 19 clones, being very careful to keep track of which colony, which tube, and which patch you are up to (labelling before you start is important!)
-
Put the PCRs on the thermocycler and incubate the agar plate at 37°C overnight.
-
Run out the PCRs on an agarose gel, and note which clones give a positive result.
Note: If none of your clones are positive, you can try screening more clones (e.g. another 20), but if you still don’t find your clone of interest after screening ~40 clones, something is wrong – check all your ligation and transformation controls, check all your primer sequences and thermocycling conditions. You may need to repeat the cloning process. It is also possible that the gene you are trying to clone is toxic to the host cells – you may need to try a different vector or different host or different incubation conditions.
-
Examine the patch plates prepared above. Choose up to seven of the clones that gave a positive PCR in the left junction screen (at least three is recommended).
-
Set up a PCR master mix using the right junction primer set. Remember to make enough master mix so that there is at least 10% more than you need, so you don’t run out.
-
Screen the putative positive clones as described above, by colony PCR. Again, be careful to label everything before you start. Pay close attention to which clone patch is going into which PCR tube.
-
After thermocycling, run out the PCRs on agarose, and note which are positive for the right junction. Choose one of these for a plasmid prep; use this clone to inoculate 100 ml LB-antibiotic broth (see other protocol for details of plasmid prep).
-
Keep the patch plate! (wrap in parafilm, and store in cold room) – you may need to come back to this plate to plasmid prep a different clone if there are problems with the first one.